Protected areas in Africa: Mapbox + FastAPI
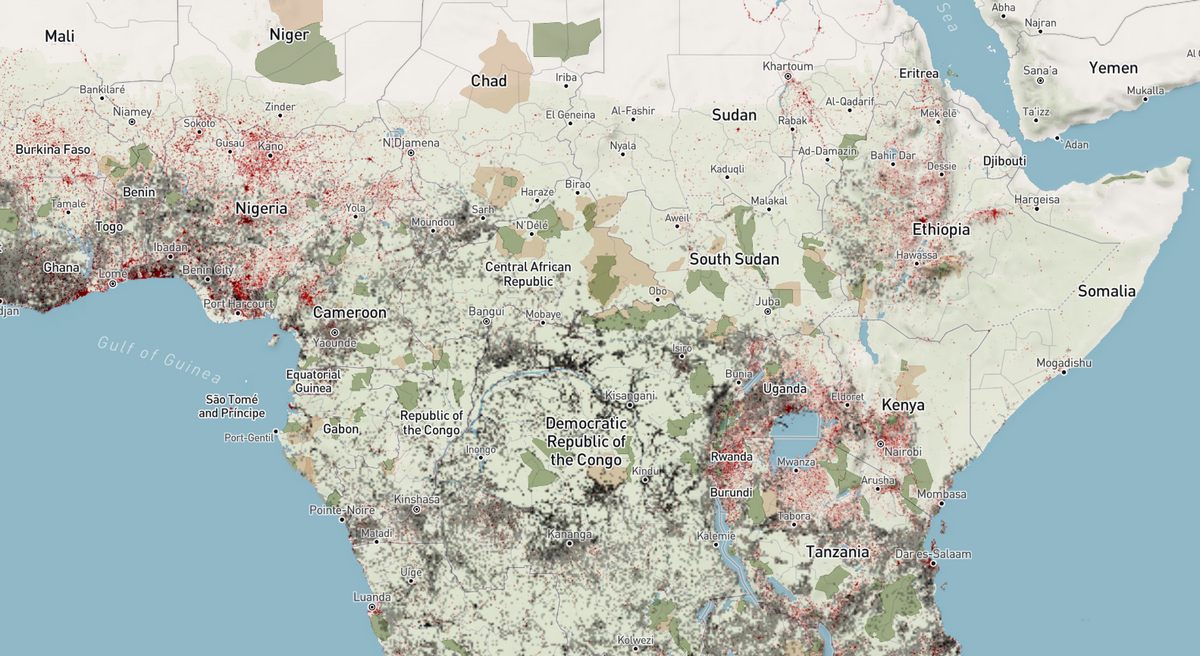
What is the state of protected areas across Africa? I built a geospatial web application using FastAPI, Mapbox GL JS and Docker to find out.
Officially, there are over 8000 formally registered protected areas just in Africa according to the World Database of Protected Areas. Unfortunately, many of these landscapes have been simplified and homogenised to agriculture, settlements or mines.
I carefully searched for the most accurate global datasets that give an idea about how we have transformed landscapes. I decided to go with fewer but accurate layers, to also not have a complex black-box analysis:
- Global Forest Watch
- Built-up areas from Google's Dynamic Earth
FastAPI backend
I suppose a web map doesn't necessarily need a backend. But, pre-empting that users may want to download data in the future or query tiles, I've decided to serve the static .js files from a FastAPI app starting with the following folder structure:
project
- src
-- main.py
- static
-- index.html
-- css
-- js
--- map.js
This, then allowed me to serve static files automatically from a directory using StaticFiles
# project/src/main.py


from fastapi import FastAPI
from fastapi.staticfiles import StaticFiles

app = FastAPI()


app.mount("/", StaticFiles(directory="static",html = True), name="static")


@app.get("/data/protected_areas")
def get_protected_areass():
    return FileResponse(path="data/protected_areas.geojson")
The frontend: map.js
# project/static/js/map.js


$(document).ready(function () {

  mapboxgl.accessToken = os.getenv("MAPBOX_TOKEN");
  const map = new mapboxgl.Map({
    container: 'map', // container ID
    style: 'mapbox://styles/mapbox/outdoors-v12',
    center: [17.110295, -1.722614],
    zoom: 4
  });

});
Then, you can add a source and data layer from Mapbox or from wherever. Take a look here to see what sources are available.
# project/static/js/map.js


$(document).ready(function () {

  mapboxgl.accessToken = os.getenv("MAPBOX_TOKEN");
  const map = new mapboxgl.Map({
    container: 'map', // container ID
    style: 'mapbox://styles/mapbox/outdoors-v12',
    center: [17.110295, -1.722614],
    zoom: 4
  });

  map.on('style.load', function () {
    if (!(map.getSource('protected-areas-source'))){
      map.addSource('protected-areas-source', {
        type: 'vector',
        url: <<source_id_from_mapbox>>
      });
    };

    map.addLayer({
      'id': "protected-areas-layer",
      'type': "fill",
      'source': "protected-areas-source",
      'paint': paint_land,
      'source-layer': "protected-areas"
    )}

  });
});
The frontend: index.html
The bare minimum needed are the css stylesheet and js library from Mapbox included in the <head> tag as well as a <div> with id="map".
# project/static/index.html

<html>
<head>
<link href="https://api.mapbox.com/mapbox-gl-js/v2.7.0/mapbox-gl.css" rel="stylesheet">
<script src="https://api.mapbox.com/mapbox-gl-js/v2.7.0/mapbox-gl.js"></script>

<div id="map"></div>
</body>
</head>
</html>
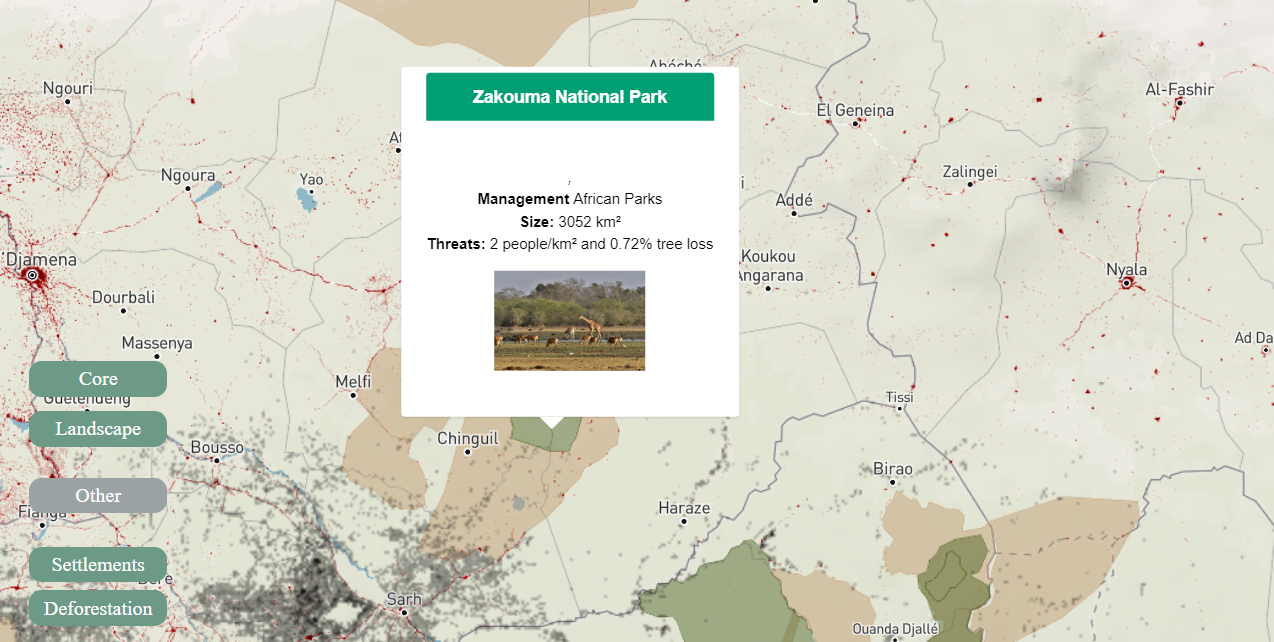
Custom button to toggle layers
We can include our own custom styling, by importing our own stylesheet, main.css and create a custom button to toggle the protected areas layer on and off. For this we'll use jquery by importing the jquery.min.js library.
# project/static/index.html

<html>
<head>
    <title>Big Map</title>
    <link rel="stylesheet" href="css/main.css" type="text/css">
    <link href="https://api.mapbox.com/mapbox-gl-js/v2.7.0/mapbox-gl.css" rel="stylesheet">
    <script src="https://api.mapbox.com/mapbox-gl-js/v2.7.0/mapbox-gl.js"></script>
    <script src="https://ajax.googleapis.com/ajax/libs/jquery/1.7.1/jquery.min.js"></script>
</head>


<body>
<nav class="custom-menu-all">
<span id="toggle_protected_areas" class="custom-menu-item-checked" title="Protected Areas"; style="bottom:55px;">
<span id="go_ap_icon" >Core</span>
<input id="toggle_protected_areas_input" type="checkbox" class="my-check" hidden checked>
</span>
</nav>
<div id="map"></div>
</body>

</html>
Then, back in the map.js, we call the custom button by adding the following code:
# Inside project/static/js/map.js

    if ($('#toggle_protected_areas_input').prop('checked')) {
      map.setLayoutProperty('pas_rest_layer', 'visibility', 'visible');
    } else {
      map.setLayoutProperty('pas_rest_layer', 'visibility', 'none');
    }

  $("#toggle_protected_areas").on("click", function () {
    $("#toggle_protected_areas").toggleClass("custom-menu-item-checked");
    $("#toggle_protected_areas").toggleClass("custom-menu-item");
    if ($('#toggle_protected_areas_input').prop('checked')) {
      map.setLayoutProperty('protected-areas-layer', 'visibility', 'none');
      $('#toggle_protected_areas_input').prop('checked', false)
    } else {
      map.setLayoutProperty('protected-areas-layer', 'visibility', 'visible');
      $('#toggle_protected_areas_input').prop('checked', true)
    }
    $("#toggle_protected_areas_input").toggle(this.checked);
  });
Also, include custom styling in main.css:
.custom-menu-all{
	min-width: 45px;
	text-align: center;
	padding: 5px;
	color:white;
	border-radius:10px;
	z-index: 1;
  margin-right: -20px;
  position: absolute;
  top: 70%;
  -webkit-transition: 0.3s;
  -o-transition: 0.3s;
  transition: 0.3s;
}

.custom-menu-item {
  width: 100px;
	min-width: 45px;
	text-align: center;
	padding: 5px;
	color:white;
	background-color: #9aa2a3;
	border-radius:10px;
	z-index: 1;
  position: absolute;
  -webkit-transition: 0.3s;
  -o-transition: 0.3s;
  transition: 0.3s;
  cursor: pointer;
}

.custom-menu-item:hover {
	color:#9aa2a3;
	background-color: white;
}

.custom-menu-item-checked {
  width: 100px;
	min-width: 45px;
	text-align: center;
	padding: 5px;
	color:white;
	background-color: #6d9a87;
	border-radius:10px;
	z-index: 1;
  position: absolute;
  -webkit-transition: 0.3s;
  -o-transition: 0.3s;
  transition: 0.3s;
  cursor: pointer;
}
Dockerize it
Let's containerise the app to easily deploy it in the future. First, export all app requirements into a requirements.txt. You can also do this automatically by using pipreqs.
Then, create a dockerfile in the project directory as such:
# project/dockerfile


FROM python:3.8

# set a directory for the app
WORKDIR /usr/src/app

# copy all the files to the container
COPY . .

# install dependencies
COPY requirements.txt /tmp/requirements.txt
RUN python3 -m pip install -r /tmp/requirements.txt

# define the port number the container should expose
EXPOSE 5000

# run the command
CMD ["uvicorn", "src.main:app", "--host", "0.0.0.0", "--port", "80"]
Next, follow these steps to use GitHub Actions to automatically publish a new docker image to Docker Hub every time you push changes to your GitHub repo.
Now, you can easily deploy a geospatial web app like this one! You can experiment more with popups and raster layers.
Next up
Currently, the rasters on my map are layers created using the Mapbox Tiling Service, but there are some limitations with this such as limited resolution.
As an alternative, I've spun up a docker container on a VM in AWS with TiTiler, an amazing dynamic tile server built on top of FastAPI and Rasterio/GDAL. But, I'm struggling with too slow request handling times. I'll keep on trying!
I'd also like to experiment with VueMapbox to improve my map interfaces.